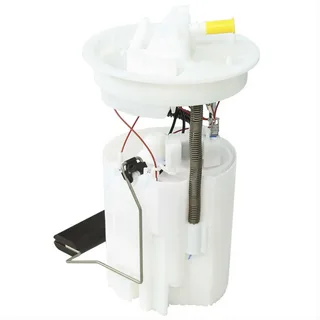
Are you ready to give your 2005 Mazda 3 a serious performance boost? Upgrading the fuel pump might be just what it needs. The factory-installed 05 Mazda 3 Fuel Pump can wear down over time, leading to decreased efficiency and potential breakdowns. Thankfully, you can tackle this DIY project with some essential tools and a little know-how.
Tools and Materials Needed
Before you upgrade your Mazda 3 fuel pump, gather the necessary tools and materials. To get started, you’ll need a few essential hand tools. A socket wrench set will help you remove bolts easily. Pliers and screwdrivers are also necessary for disconnecting various clips and connectors.
Don’t forget safety equipment like gloves and goggles to protect yourself while working. Fuel systems can be hazardous, so this step is essential. A clean workspace is equally vital; ensure you have enough room to maneuver around your vehicle comfortably.
You’ll require a new fuel pump compatible with your ’05 Mazda 3 model for materials. Check compatibility before purchasing. It’s wise to have fresh fuel line O-rings on hand, as old ones may not seal properly after removal.
Keep some rags nearby for spills or cleanup during the process—it’s always better to be prepared!
Safety Precautions
Before diving into your DIY project, it’s crucial to prioritize safety. Start by working in a well-ventilated area. Fuel vapours can be harmful, so ensure windows are open and fans are running.
Wearing protective gear is also essential. Put on gloves and goggles to shield your skin and eyes from potential spills or splashes during the process. Avoid wearing loose clothing that could get caught in machinery.
Keep a fire extinguisher nearby as an extra precaution. Although you’ll unlikely face a fire while changing your fuel pump, having one accessible can provide peace of mind.
Always follow proper disposal methods for old fuel parts and fluids. Never pour them down the drain or throw them in regular trash. Check with local regulations for safe disposal options to help protect the environment while staying safe yourself.
Locating the 2005 Mazda 3 Fuel Pump
Locating the 2005 Mazda 3 Fuel Pump is an essential step before upgrading to advanced technology. Knowing where to look will save you time and effort during this DIY project.
Typically, the fuel pump is situated inside the fuel tank. Depending on your specific model configuration, you’ll need to lift the rear seats or remove a cover panel on the vehicle’s floor to access it.
Once you’ve found that panel, be prepared for some screws or fasteners that need removal, keep them organized as you work; they’ll be crucial for reassembly later.
If you’re unsure how to locate it, consult your owner’s manual or online forums dedicated to Mazda enthusiasts. They often provide detailed diagrams that can guide you through this process smoothly.
Disconnecting the Battery
Disconnecting the battery is crucial before diving into any work on your Mazda 3 fuel pump. This action ensures your safety and prevents electrical mishaps while under the hood. A simple oversight can lead to short circuits or damage to sensitive components.
To start, locate your vehicle’s battery, usually found in the engine compartment. You’ll notice two terminals: positive (often red) and negative (typically black). Begin by loosening the negative terminal first; this is key for reducing potential sparks when disconnecting it.
Carefully remove the negative cable from its post using a wrench or pliers. Ensure it’s secured from any metal car parts to avoid accidental reconnection.
Removing the Old Fuel Pump
Before you can install your new fuel pump, you must remove the old one. Make sure all tools are within reach. This step requires precision, so take your time.
Locate the fasteners securing the fuel pump assembly. These may vary slightly based on specific models or configurations in your 2005 Mazda 3. Use a socket wrench to loosen and carefully remove them without stripping any screws.
Disconnect any electrical connectors attached to the pump itself. Don’t damage these connections; they will be vital for installing your new unit later. With everything disconnected and removed, you’re ready for the next phase of this exciting DIY project!
Installing the New 2005 Mazda 3 Fuel Pump Replacement
Installing the new 2005 Mazda 3 Fuel Pump Replacement is straightforward if you follow the proper steps. Begin by carefully placing the new pump into its designated housing. Ensure it sits snugly to prevent vibrations or movement once the car operates.
Next, connect all necessary wiring and hoses. Pay attention to any specific connectors that may require alignment or secure fastening. A good fit will ensure optimal performance and longevity of your new component.
Once everything is connected, replace any retaining clips or screws that were removed during disassembly. This adds stability and ensures your installation holds firm under various driving conditions.
Before securing everything entirely, double-check each connection for tightness and correct placement. Taking this extra moment can save potential headaches down the road, such as leaks or malfunctions caused by improper installation.
Reconnecting the Battery
Once the new fuel pump is securely in place, it’s time to reconnect the battery. This step is crucial for ensuring your Mazda 3 can power up and run properly after the installation. Start by locating your vehicle’s battery terminals under the hood.
When reconnecting, first permanently attach the positive terminal. It’s usually marked with a plus sign (+) or red cover. Secure it tightly to avoid any loose connections that could cause issues later.
Next, move on to the negative terminal. This one is typically marked with a minus sign (-) or black cover. Like before, ensure it’s firmly attached to prevent accidental disconnections while driving.
After both terminals are back in position, double-check everything looks good before closing the hood. Your vehicle should now be ready for testing!
Testing the New Fuel Pump
After installing the new fuel pump, it’s time to test its functionality. Start by turning the ignition key to the “On” position without starting the engine. This allows the fuel pump to prime and pressurize the fuel system. Listen closely for a humming sound, which indicates that your new pump is working.
Next, check for leaks around the installation area. Hoses should be securely connected with no signs of dripping or wetness. If you notice anything unusual, addressing these issues before proceeding further is essential.
Once you’ve ensured no leaks, attempt to start your Mazda 3. The engine should turn over smoothly if everything functions correctly without sputtering or hesitation. Keep an ear out for any strange noises during startup.
Let your vehicle run for a few minutes, and watch how it behaves when idle. Pay attention to performance—smooth acceleration is a good sign that your installation was successful.
Post-Installation Checks
After replacing the Mazda 3 fuel pump, it’s essential to perform thorough post-installation checks to ensure the system is functioning correctly.
Visual Inspection
Start by checking the installation area for any leaks or loose connections. Ensure that all hoses and fittings are secure, as even a small leak can cause significant problems down the road.
Electrical Connections Check
Verify that all electrical connections are properly plugged in. Ensure there are no frayed wires or exposed terminals, as a solid connection is crucial for the proper operation of the fuel pump.
Priming the Fuel System
Turn on the ignition without starting the engine. This step allows the fuel system to prime and build pressure. Listen carefully for any unusual sounds around the fuel tank during this process.
Common Issues and Troubleshooting your 06 Mazda 3 Fuel Pump
You might encounter a few common issues after installing your 06 Mazda 3 Fuel Pump. One frequent problem is inconsistent fuel pressure, which can lead to engine stalling or poor acceleration. Check the connections and ensure that everything is adequately secured.
Another issue could be an unusual noise coming from the fuel tank area. If you hear whirring or whining sounds, it may indicate that the pump is struggling. Inspect for any blockages in the lines, or consider if the new pump is compatible with your vehicle.
Leaks are another concern to watch out for post-installation. Fuel leaks can pose safety hazards and should be addressed immediately. Look around all fittings and hoses to spot signs of leakage.
Keep an eye on warning lights on your dashboard. If they illuminate after installation, use an OBD-II scanner to diagnose potential faults related to the fuel system.
Conclusion
Upgrading the 05 Mazda 3 Fuel Pump is a rewarding project that enhances performance and reliability. You can tackle this DIY task with the right tools and materials without overwhelming yourself. It’s essential to follow each step carefully, from locating the old fuel pump to installing the new one. Taking safety precautions ensures a smooth process while maintaining your vehicle’s integrity.
FAQs
What tools do I need for this upgrade?
You’ll need essential hand tools like wrenches, screwdrivers, and pliers. A fuel line disconnect tool may also be helpful.
How long does the installation take?
The entire process can be completed in about two to four hours, depending on your experience level and any unforeseen issues you encounter.
Is it difficult to replace a 05 Mazda 3 Fuel Pump myself?
While it requires some mechanical skill and knowledge of vehicle 05 Mazda 3 Fuel Pump systems, many DIY enthusiasts successfully tackle this project with patience and attention to detail.
What should I do if my new fuel pump doesn’t work?
Double-check all connections first if the new unit isn’t functioning as expected. Ensure everything was appropriately reconnected before considering other factors like faulty parts or electrical problems.


