
The Hyundai Sonata is a well-regarded vehicle known for its reliability and style. However, even the best cars can experience wear and tear over time. One common issue Sonata owners might face is a faulty interior door handle. This comprehensive guide will walk through the process of hyundai sonata interior door handle replacement, ensuring the car’s functionality and aesthetic appeal are restored.
Identifying the Need for Replacement
Determining if the Hyundai Sonata’s interior door handle requires replacement involves recognizing specific signs of wear. Symptoms include difficulty opening the door from the inside, a loose or wobbly handle, or visible cracks and damage. If these indicators are present, it suggests the handle has deteriorated and needs to be replaced to maintain the vehicle’s functionality and aesthetics.
Replacing the interior door handle on a Hyundai Sonata can enhance the vehicle’s functionality and aesthetic appeal. To ensure a smooth and successful replacement process, gathering all the necessary tools and materials beforehand is crucial. This preparation will streamline the procedure and help prevent any potential damage to the vehicle’s interior.
Start by collecting a set of screwdrivers, including both flat-head and Phillips screwdrivers, as these will be required to remove screws securing the door panel. A trim removal tool is also essential, as it will help safely detach the door panel without causing scratches or damage to the surrounding surfaces. This tool is designed to minimize the risk of breaking clips or cracking the plastic trim, a common issue when using improper tools.
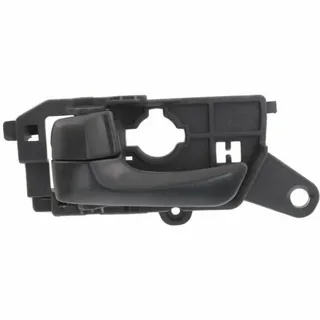
Compatible New Interior Door Handle
In addition to these tools, ensure you have a compatible new interior door handle specific to your Hyundai Sonata model. It’sDouble-check the part number and compatibility to avoid any mismatches that could lead to further complications during installation. Lastly, keep a soft cloth or protective material handy to cover any surfaces where you’ll be working. This will help protect the vehicle’s interior from scratches, scuffs, or accidental damage while replacing the handle.
You can work more efficiently and effectively by assembling these tools and materials in advance. This proactive approach will save time during the replacement process and enhance your overall experience, allowing you to focus on achieving a professional-quality result. Once you have everything ready, you can proceed confidently, knowing that you are well-prepared for the task.
Ensuring safety is paramount before commencing any vehicle repair. Begin by parking the car on a stable, flat surface and switching off the ignition. Wearing gloves can protect the hands while disconnecting the car battery, preventing accidental electrical issues. These precautions are essential to maintain a safe working environment during the interior door handle replacement process.
Removing the Door Panel
To begin the process of removing the door panel from your vehicle, start by locating and unscrewing all visible screws.
- These screws are typically found along the edges of the panel, around the handle, or behind any decorative trim pieces.
- Make sure to use the appropriate screwdriver to avoid stripping the screws.
- Once all screws are removed, it’s time to proceed to the next step.
- Next, use a trim removal tool designed specifically for this purpose to gently pry the door panel away from the door frame.
- Be cautious and work slowly to avoid damaging any clips or wiring that may be attached to the panel.
Start At One Corner Of The Panel: Sonata Inner Door Handle
It’s advisable to start at one corner of the panel and work your way around, carefully prying the panel free from the door. By working methodically, you can ensure that all fastening points are gradually released without putting excessive stress on any part of the panel.
As you progress, keep an eye out for any additional clips that may not be immediately visible. Once you have successfully disengaged all screws and clips, carefully lift the door panel to detach it from the door entirely.
During this process, ensure that no wires are tugged or strained. If you encounter any resistance, double-check for any remaining fasteners before proceeding of Sonata Inner Door Handle. Handling the wiring gently is essential, as any damage could lead to electrical issues later on. Once the panel is free, please place it safely to prevent any scratches or damage while you perform your repairs or upgrades. These steps will help ensure a smooth and safe removal process, paving the way for further work on the door or window mechanism.
Disconnecting the Old Handle
To begin replacing the interior door handle on your Hyundai Sonata, first remove the door panel. This typically involves prying off any trim pieces and unscrewing bolts that hold the panel in place. Ensure you have the necessary tools, such as a screwdriver and a trim removal tool, to avoid damaging the panel or surrounding areas.
Locating the Fastenings
Once the door panel is removed, carefully examine the area to locate the screws or clips that secure the old handle to the door mechanism. These fastenings are usually positioned near the base of the handle, and it’s essential to identify them accurately for a smooth removal process.
Removing Screws and Clips
Using the appropriate screwdriver, gently unscrew or unclip the fastenings that hold the old handle in place. Keep track of each screw or clip’s position to ensure correct reassembly later.
Detaching Connecting Components
After removing the fastenings, the next step is to detach any connecting rods or cables from the handle. Doing this gently is essential to avoid damaging the components, which could lead to additional repairs.
Protecting Surrounding Surfaces
During removal, use a soft cloth to protect surrounding surfaces from scratches or damage. This step is crucial as you maneuver tools around delicate areas of the door interior.
Preparing for Installation
With the old handle successfully removed, you can now prepare for the installation of the new interior door handle. Following the correct disconnection steps ensures a seamless transition to the new handle, maintaining the door’s functionality and appearance.
Comparing the Old Handle with the New One
Carefully examine the old and new door handles to ensure they are identical in size, shape, and mounting points. Pay attention to the alignment of screw holes and any connecting components. This comparison step is critical to ensure that the new handle will fit seamlessly into the existing door mechanism, preventing any issues during installation.
Installing the New Door Handle
Attach the new interior door handle by securing it with the previously removed screws or clips. Ensure any connecting rods or cables are reattached accurately and securely. Carefully align the handle with the door mechanism to guarantee a proper fit. Use a screwdriver to tighten all fastenings, taking care not to over-tighten and risk damaging the handle or door mechanism. Check the handle’s movement to ensure it operates smoothly before reassembling the door panel.
Reconnecting the Handle Mechanism
Reconnecting the handle mechanism involves ensuring the components’ precise alignment and secure attachment. Verify the correct positioning of connecting rods and cables to facilitate proper operation. Gently reconnect each element, taking care not to force any parts. This step ensures the newly installed handle functions reliably, maintaining the integrity of the door mechanism.
Reattaching the Door Panel
Align the door panel with the door frame, ensuring all clips and wiring are positioned correctly. Replace the previously removed screws, starting from the top and working downwards. Use a trim removal tool to gently press the panel into place, securing it with even pressure to avoid damaging the clips. Double-check that the panel sits flush against the door and that no components are pinched or misaligned.
Aligning the Door Panel
Aligning the door panel with the door frame is crucial in ensuring a proper fit and function. Begin by positioning the panel to align all clips and wiring. This attention to detail is essential for a seamless installation.
Replacing the Screws
After ensuring proper alignment, it’s time to replace the previously removed screws. Start at the top of the panel and work your way downwards. This method helps maintain even pressure on the panel, preventing misalignment as you secure it back to the door frame.
Using a Trim Removal Tool
To secure the panel effectively, gently press the panel into place using a trim removal tool. This tool helps apply even pressure across the panel, ensuring that all clips engage correctly without causing damage. Be careful not to use excessive force, which could lead to breakage.
Testing the New Handle
To ensure the newly installed handle operates correctly, open and close the door from the inside multiple times, paying close attention to the handle’s movement and any sounds it might produce. Look for any signs of resistance or irregularities in operation. It’s also advisable to check the handle’s alignment and secure attachment.
If the handle functions smoothly without issues, it indicates a successful installation. If any problems are detected, revisit the installation steps to identify and correct misalignments or loose connections. This thorough testing guarantees that the interior door handle replacement has been performed accurately and that the door handle is functioning as expected.
Troubleshooting Common Issues: Hyundai Sonata Interior Door Handle
If issues are detected during testing, verify all connections and fastenings for any looseness or misalignment. Check that the screws and clips securing the Hyundai Sonata Interior Door Handle is adequately tightened and that connecting rods or cables are correctly positioned. Inspect for any parts that might have been inadvertently overlooked or improperly attached.
If the door handle movement is not smooth, consider re-examining the alignment and reinstallation steps. Ensuring each component is accurately placed and securely fastened can resolve common problems encountered during the interior door handle replacement process.
Maintenance Tips for Longevity
Regularly inspect the new interior door handle for any signs of wear or looseness, addressing issues promptly to prevent further damage. Keeping the handle clean and debris-free can significantly enhance its performance and durability.
Lubricating moving parts with a suitable product can also help maintain smooth operation. By following these maintenance tips, the Hyundai Sonata’s interior door handle will remain in optimal condition, providing dependable functionality over an extended period.
Conclusion
Replacing a Hyundai Sonata interior door handle is a relatively straightforward task that can be completed with the right tools and instructions. By following the steps outlined in this guide, you can successfully remove the old handle and install the Sonata Inner Door Handle, restoring the functionality and aesthetics of your vehicle’s interior.
FAQs
1. Do I need any special tools to replace the Hyundai Sonata interior door handle?
While some basic tools like screwdrivers and pliers may be necessary, most of the tools required should be found in a standard toolkit. However, it is always a good idea to consult the vehicle’s service manual for specific tool recommendations.
2. Can I replace the interior door handle myself, or should I take it to a mechanic?
If you feel comfortable working on your vehicle and have a basic understanding of automotive repairs, you can usually replace the interior door handle yourself. However, if you are unsure or encounter difficulties, it is best to seek professional assistance from a qualified mechanic.
3. How long does it typically take to replace a Sonata Inner Door Handle?
The time required to Sonata Inner Door Handle can vary depending on the specific model and any additional challenges encountered. However, with the proper tools and instructions, it is generally a relatively straightforward task that can be completed in under an hour.